
How to Create WhatsApp Campaigns
Send automated WhatsApp reminders ahead of a renewal or expiry date. Import contacts, schedule a template per reminder day, and track who was contacted, replied, and acted.
Before you begin
Campaigns let you reach customers first, instead of waiting for them to message you. ChatFlow Campaigns are automated WhatsApp reminders timed to a date you already hold, such as a policy renewal, subscription end, or appointment. You import a list of customers with their renewal or expiry dates, schedule which days to remind them, and ChatFlow sends the right message on the right day. Then you track who was contacted, who replied, and who acted.
WhatsApp only, and sent automatically
Campaigns send over WhatsApp, so you need a connected WhatsApp Business account first. There is no email or SMS campaign type. Messages are sent automatically on a schedule (there is no manual "send now" button): once a campaign is active, ChatFlow sends each customer their reminder when their renewal or expiry date is the configured number of days away.
Who can use Campaigns
Campaigns is gated by both role and plan.
| Requirement | Detail |
|---|---|
| Role | Account Manager, Supervisor, Admin, or Owner. Agents and Support Agents do not see Campaigns. |
| Plan | Included on Enterprise, and available to everyone during the 14-day trial. On other plans it is enabled per organization by an admin. If you do not see it, check your plan on Manage Your Subscription. |
| Channel | A connected WhatsApp Business account. See Connect WhatsApp. |
The Campaigns workspace
Select Campaigns in the sidebar (under BOTS & AGENTS). The workspace has five tabs:
| Tab | What it does |
|---|---|
| Dashboard | Connect a WhatsApp number, see campaign stats, and track every customer's status. |
| Import | Add customers from a CSV file or your own REST API. |
| Campaign | Build the reminder schedule: send time, which days to remind, and the template per day. |
| Templates | Write the reminder messages and their variables. |
| Webhook | Forward campaign events (sent, delivered, replied) to your own systems. |
The rest of this guide walks the tabs in the order you would use them.
Step 1: Connect a WhatsApp number
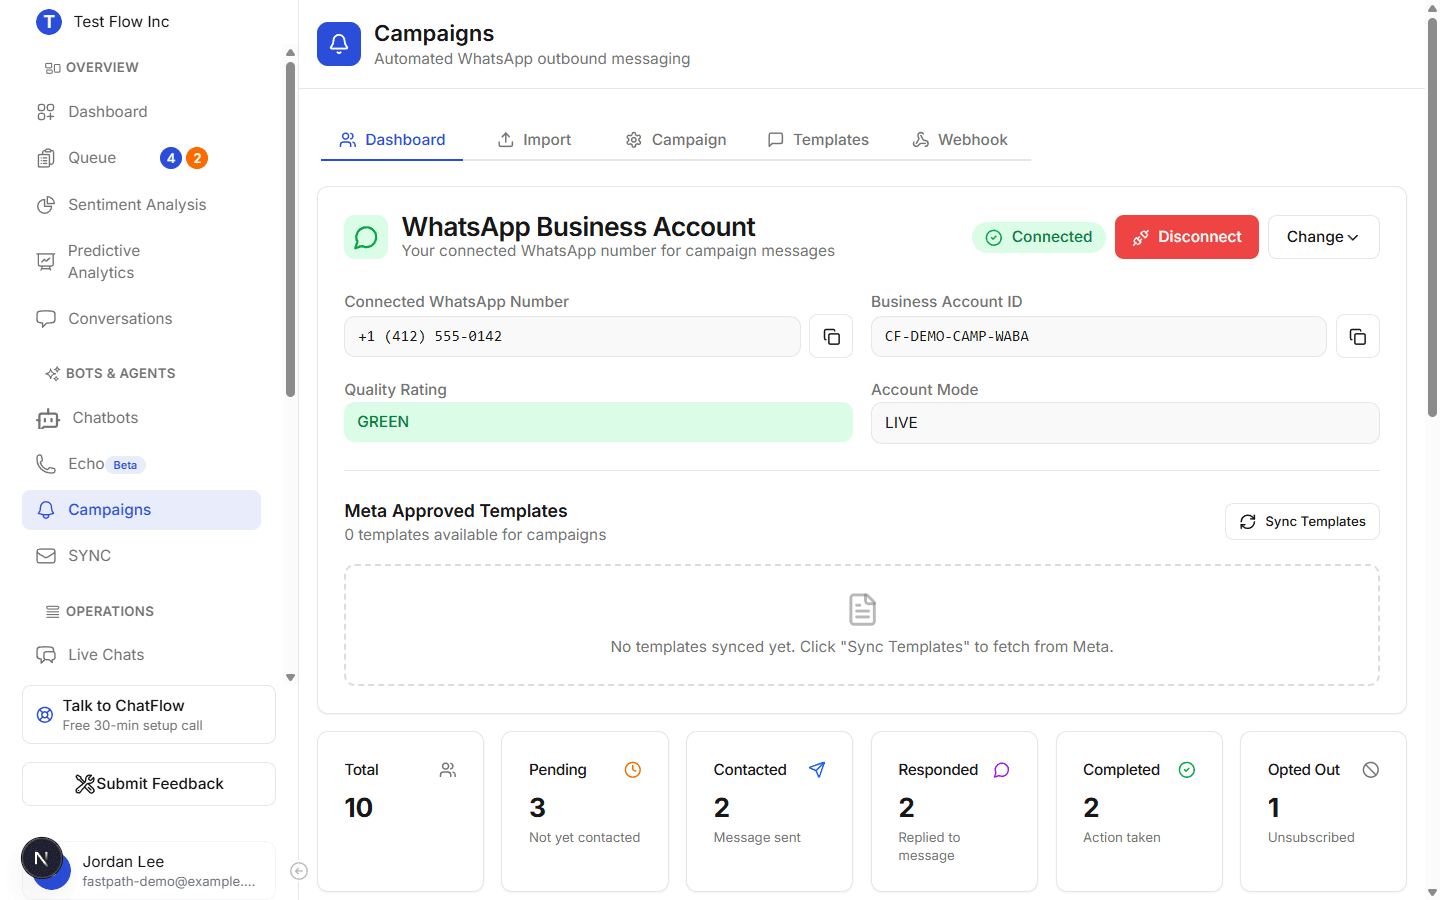
Open the Dashboard tab and select Connect WhatsApp Business, or Select Connection if you already have a number. You can use a connection that is dedicated to campaigns, or share an existing chatbot's WhatsApp number.
Once connected, the Dashboard shows the number, its Business Account ID, the WhatsApp quality rating (GREEN, YELLOW, or RED), and the account mode (LIVE or SANDBOX).
Watch the quality rating
A GREEN rating means WhatsApp considers the number healthy. If it drops to YELLOW or RED, delivery can be throttled. Keep messages relevant and always include an opt-out line (see Step 3).
Step 2: Import your customers
Open the Import tab. There are two ways to add customers.
- Upload CSV: choose a
.csvfile. ChatFlow recognises flexible column names. The phone number is required; name, reference or policy number, and the renewal or expiry date are recommended. - API Endpoint: pull customers from your own REST API by entering its URL (and an optional API key). The expected JSON shape is shown on the tab.
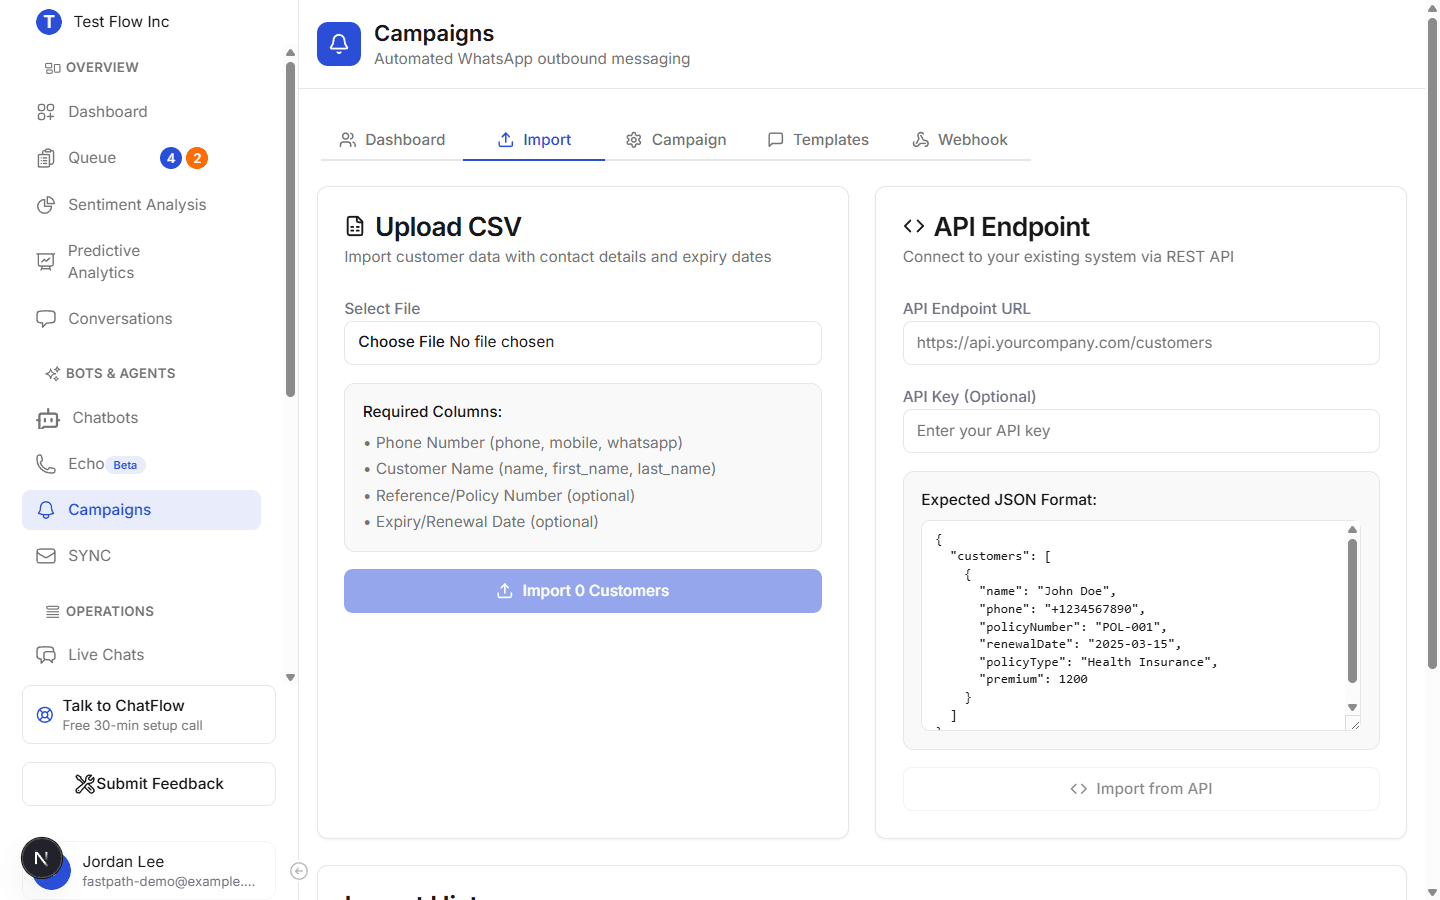
| CSV column | Accepted headers | Required |
|---|---|---|
| Phone number | phone, mobile, whatsapp | Yes |
| Customer name | name, first name, last name | Recommended |
| Reference | policy number, policy, reference id | Optional |
| Expiry date | renewal date, expiry date, due date | Recommended for reminders |
Imported customers appear in Customer Status Tracking on the Dashboard, each starting as Pending. The Import tab also keeps a short history of your recent imports with their record counts.
Include the renewal or expiry date
The expiry date is what the schedule counts back from. Without it, a customer cannot be matched to a reminder day, so they will not receive a scheduled message.
Step 3: Write your message templates
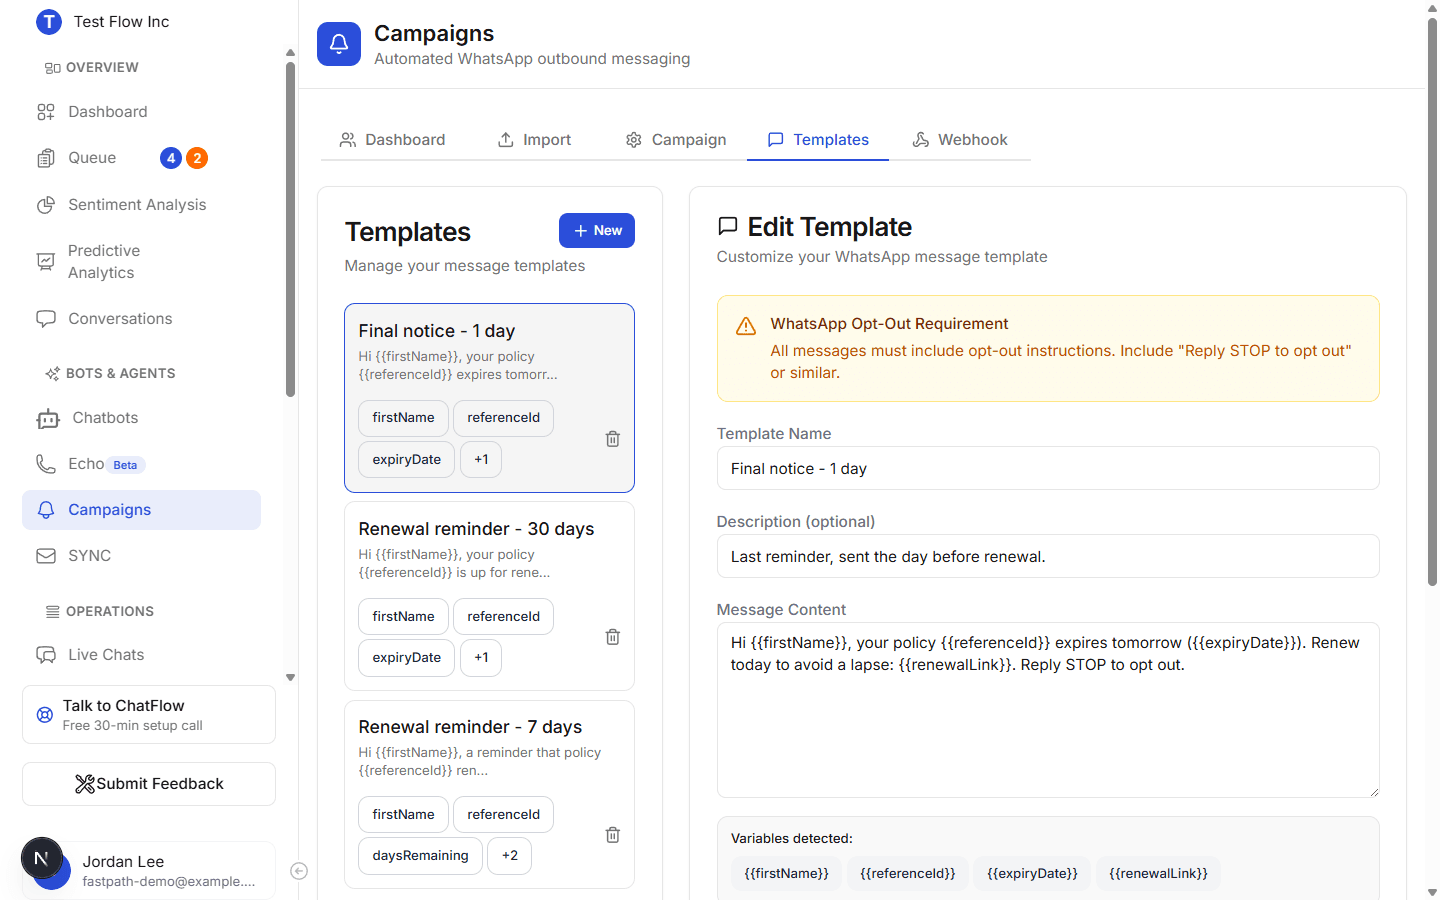
Open the Templates tab and select New to write a reminder. Each template has a name and a message body. Insert variables with double braces, for example {{firstName}}, {{referenceId}}, {{expiryDate}}, {{daysRemaining}}, and {{renewalLink}}. ChatFlow fills these in per customer when the message is sent.
Every template needs an opt-out line
ChatFlow requires your message to include opt-out instructions, such as "Reply STOP to opt out". You will see a warning until you add one. This keeps you compliant and protects your number's quality rating.
Two kinds of templates
The templates you write here are ChatFlow message templates. WhatsApp also has its own approved templates that Meta must review before you can message someone outside the 24-hour window. You sync those from Meta with Sync Templates on the Dashboard tab. The "Meta Approved Templates" section shows what has synced.
Step 4: Build the reminder schedule
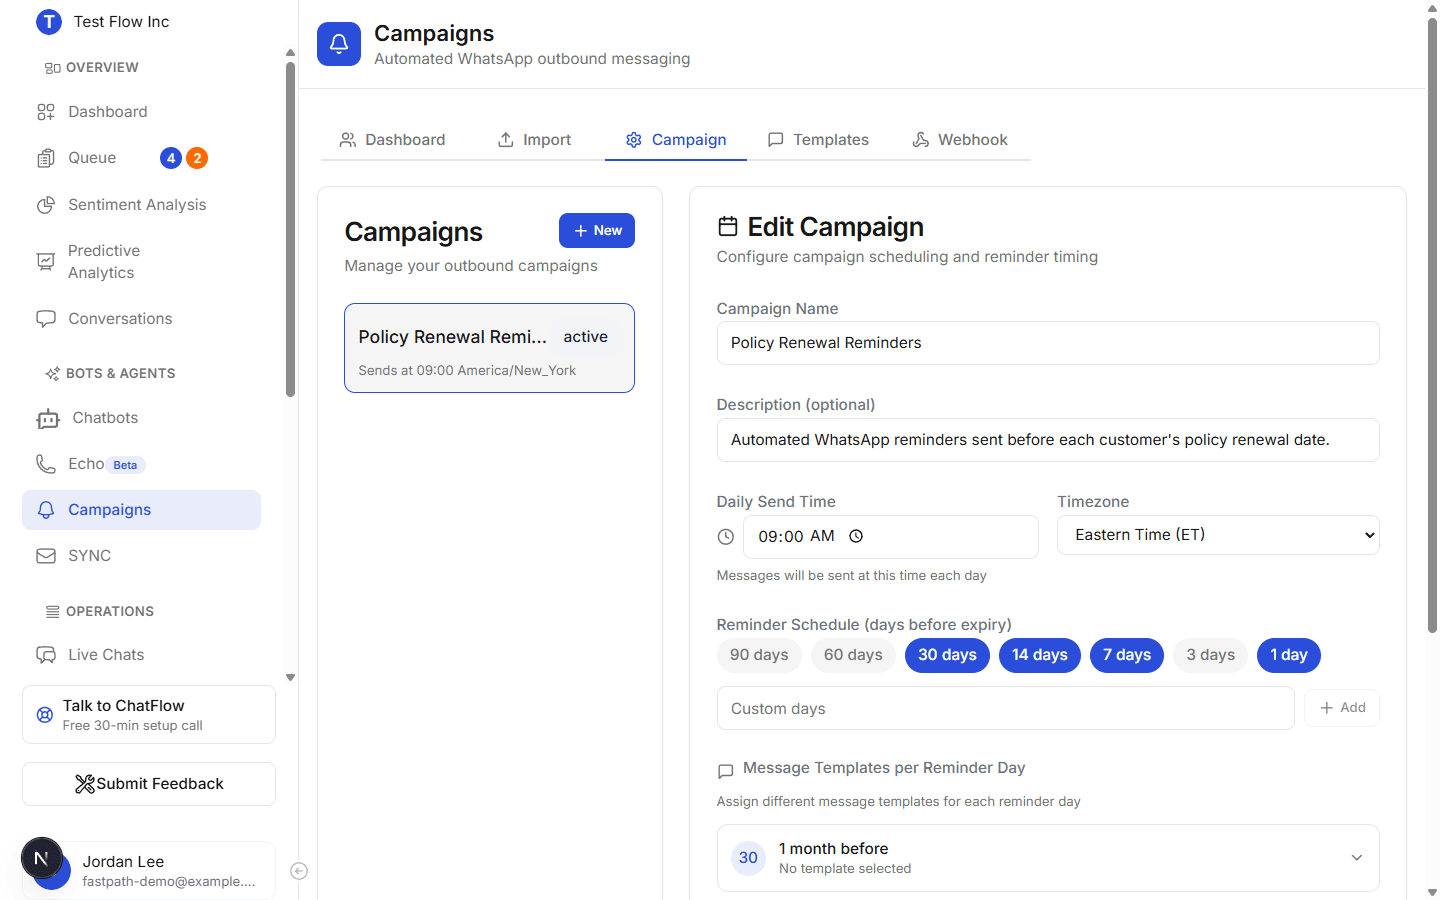
Open the Campaign tab and select New, or pick an existing campaign to edit. This is where a campaign becomes a schedule rather than a one-off blast.
Name the campaign
Give it a clear name, like "Policy Renewal Reminders", and an optional description.
Set the daily send time and timezone
Daily Send Time is the time each day that ChatFlow sends due reminders. Timezone makes sure that time means the same thing for you and your customers.
Choose which days to remind
Under Reminder Schedule (days before expiry), turn on the points where you want a message to go out, for example 30, 14, 7, and 1 days before the date. Add a custom number of days if you need one.
Assign a template to each day
Under Message Templates per Reminder Day, pick which template sends on each day you selected. You can use a softer note at 30 days and a firmer "expires tomorrow" message at 1 day.
Activate it
Set the campaign status to Active. ChatFlow then sends automatically: at your daily send time, any customer whose expiry date is one of your reminder days away gets that day's template. Use Pause to stop sending without deleting the campaign.
How sending actually works
There is no "send now" button. A background scheduler runs at your daily send time, finds customers whose renewal or expiry date matches one of your reminder days, sends them the template for that day, and updates their status. A customer is messaged once per reminder day, not repeatedly.
Step 5: Track results
Back on the Dashboard, the stat cards summarise the whole campaign, and Customer Status Tracking lists every customer. Use the search box and the status filters to narrow the list.
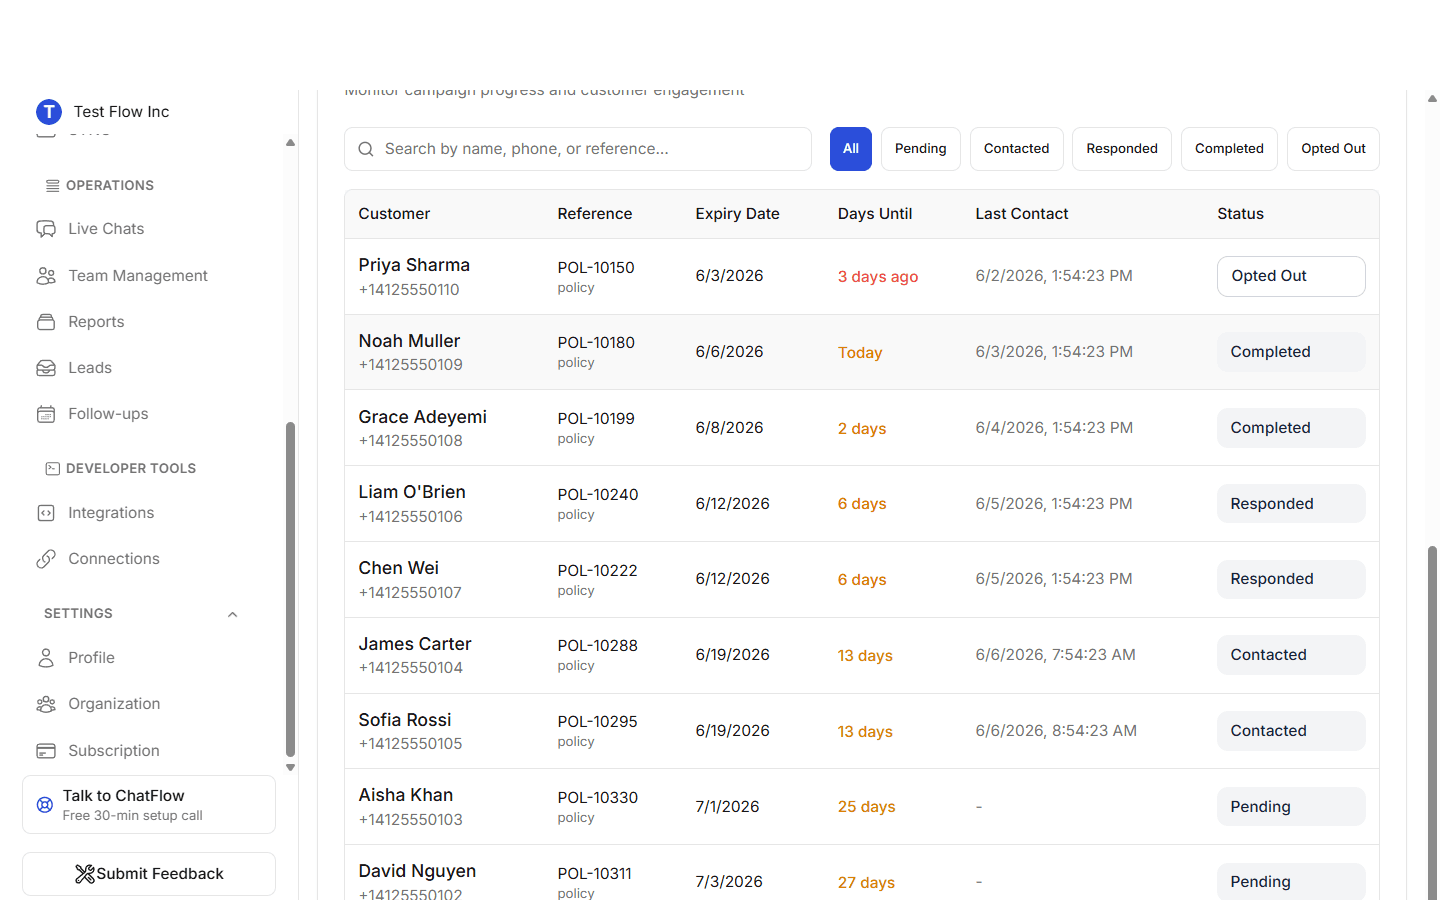
Each customer moves through these states:
| Status | Meaning |
|---|---|
| Pending | Imported but not yet contacted. |
| Contacted | A reminder has been sent. |
| Responded | The customer replied to a reminder. |
| Completed | The customer took the action you wanted (for example, renewed). |
| Opted Out | The customer unsubscribed. |
You may also see Failed on a customer whose message could not be delivered, for example an invalid number. Replies also appear in Conversations, so an agent can pick up the thread.
Opt-outs and re-opt-ins
Customers control their own consent over WhatsApp:
- Replying STOP, UNSUBSCRIBE, OPT OUT, CANCEL, or REMOVE opts them out. They move to Opted Out and receive no further messages.
- Replying START opts them back in.
This is automatic, which is why every template must carry an opt-out line.
Forward events to your own systems (Webhook)
The Webhook tab posts campaign events to a URL you control, which is useful for syncing replies or status changes into a CRM.
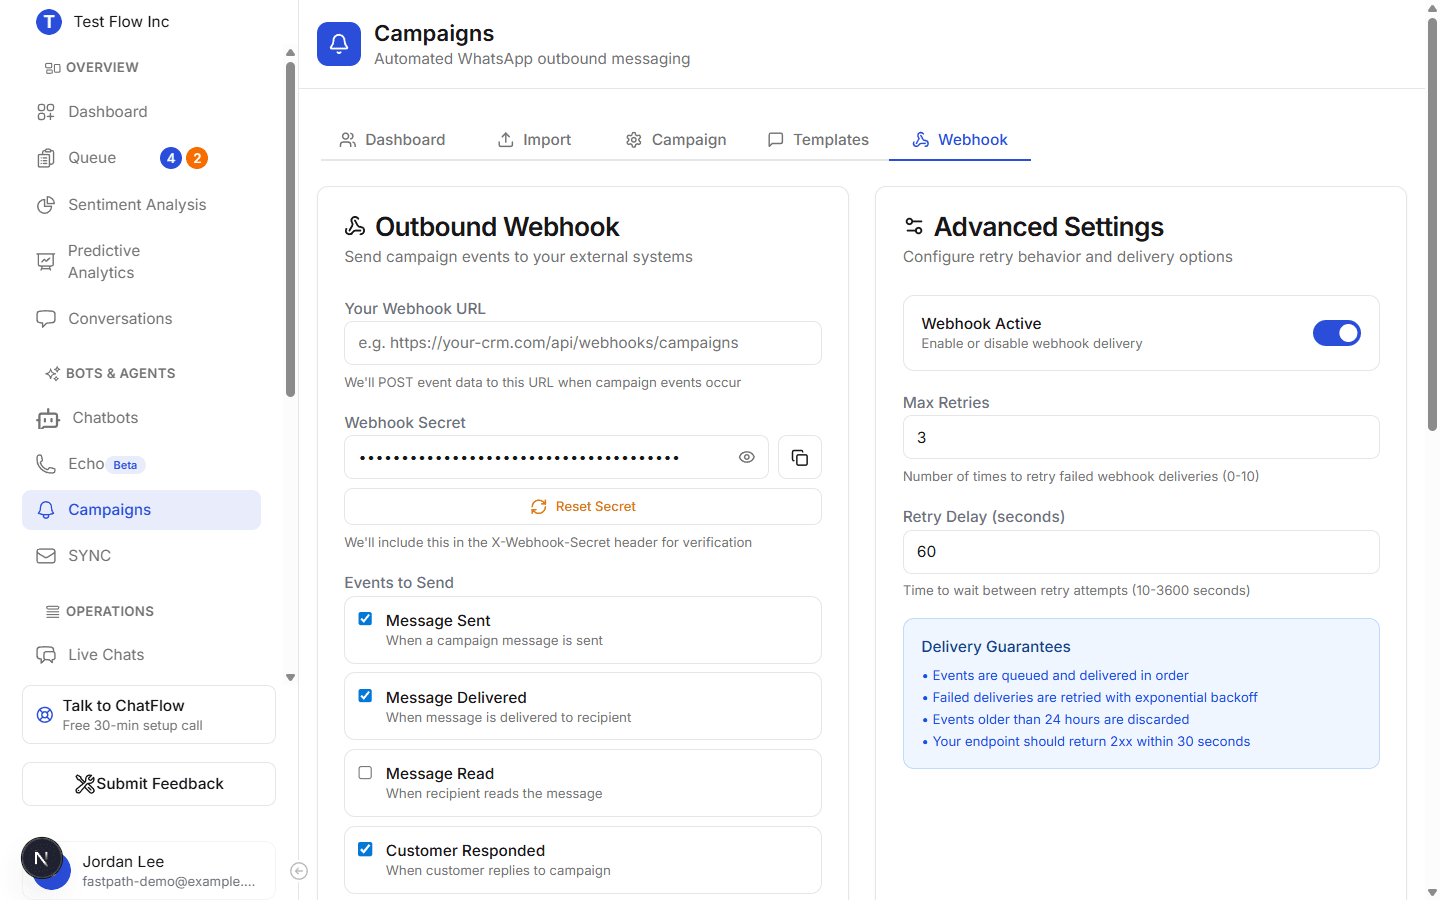
- Webhook URL and a secret sent in the
X-Webhook-Secretheader so you can verify the call. - Events to send: message sent, delivered, read, and customer responded, completed, or opted out.
- Advanced Settings: turn the webhook on or off, set max retries and retry delay. Deliveries are queued and retried with backoff, and events older than 24 hours are dropped.
Verify it's working
- On the Dashboard, confirm your WhatsApp number shows as Connected.
- Confirm imported customers appear under Customer Status Tracking as Pending.
- Confirm your campaign is Active with at least one reminder day and a template assigned to it.
- After a send, watch Contacted rise, and replies land under Responded and in Conversations.
Troubleshooting
I cannot see the Campaigns page
Campaigns needs an Account Manager role or higher, and a plan that includes it (Enterprise, or any plan during the trial). Check your subscription or ask an Owner to enable it.
I cannot connect or send
You need a connected WhatsApp Business account. On the Dashboard tab, use Connect WhatsApp Business (or Select Connection) first.
Customers are not being contacted
Confirm three things: the campaign is Active, each customer has a valid expiry date, and that date lines up with one of your reminder days. A customer with no expiry date, or whose date is not a reminder day away, is not scheduled.
Messages are not delivered
Check that phone numbers are valid and include country codes, that the number's quality rating is healthy, and that your template includes an opt-out line. For messages outside the 24-hour window, WhatsApp requires a Meta-approved template, synced with Sync Templates on the Dashboard.